Easy Peanut Butter Blossoms Ready in 20 Minutes
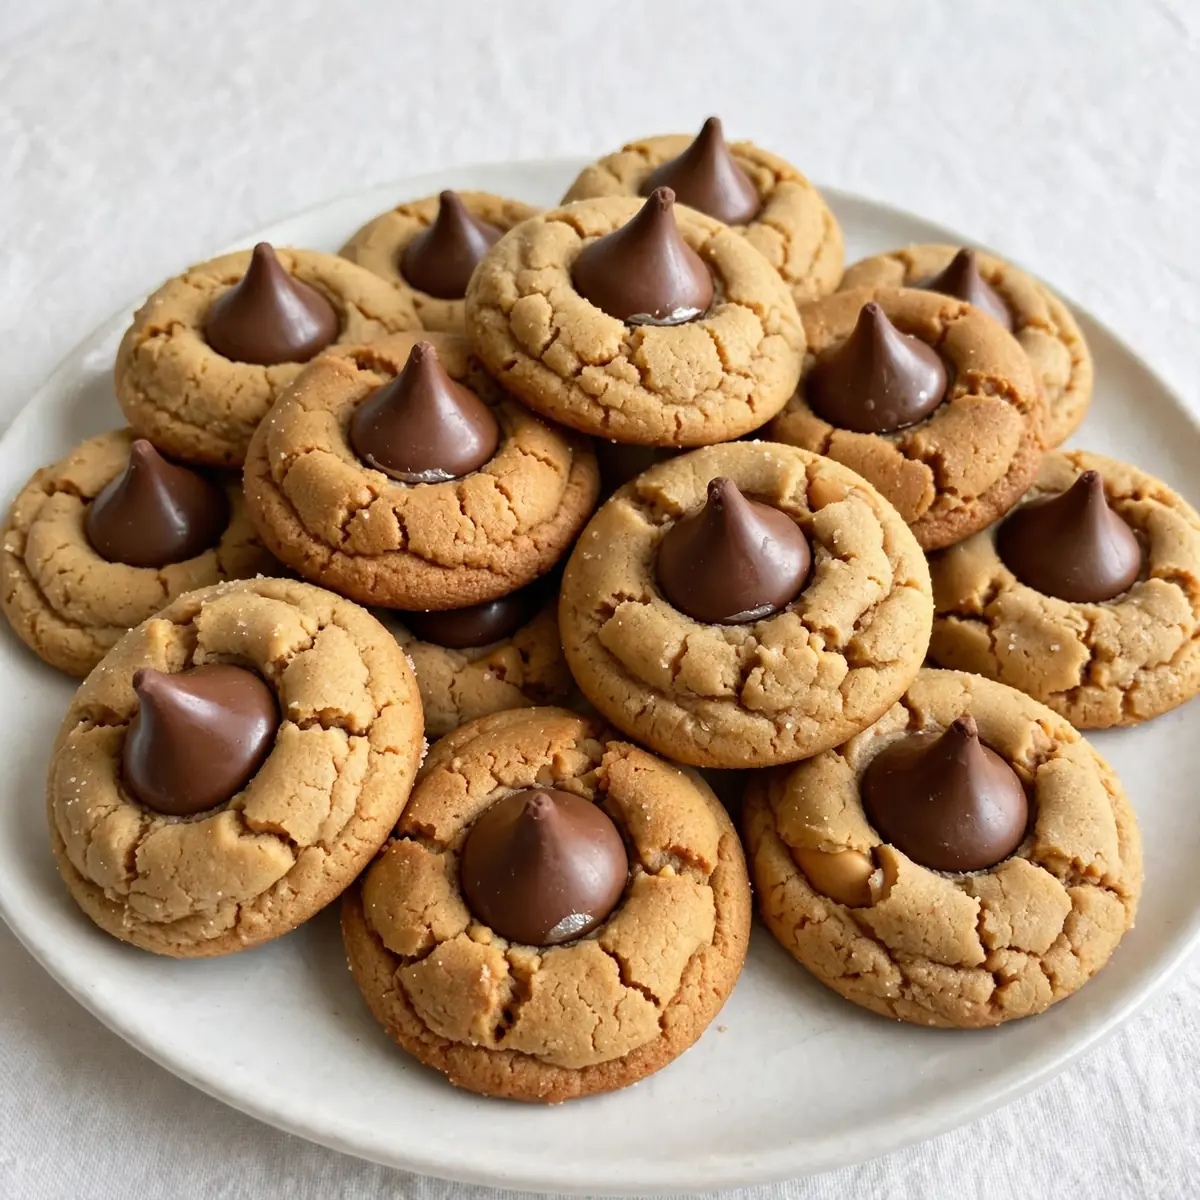
I remember the Tuesday evening I first made these Peanut Butter Blossoms for dinner instead of dessert. My kids were ravenous, the kitchen looked like a bomb had gone off, and I needed something that felt special but required almost no effort. That night, a tray of these golden, soft-centred beauties hit the table in under thirty minutes, and I’ve never looked back. Let’s get straight to the recipe that turned our chaotic weeknights around.
Recipe Overview
- Prep Time: 10 minutes
- Cook Time: 10-12 minutes
- Total Time: 22 minutes
- Servings: 24 cookies
- Difficulty: Easy
Why You’ll Love This Peanut Butter Blossoms
- Weeknight Speed: From mixing bowl to plate in under 25 minutes, this recipe fits into the tightest of evening schedules. No chilling or resting required.
- One-Bowl Cleanup: Everything comes together in a single bowl, meaning you spend less time scrubbing and more time sitting down with your family.
- Pantry-Friendly Ingredients: You likely already have peanut butter, sugar, and flour in your cupboards. No last-minute supermarket dashes needed.
- Make-Ahead Magic: The dough freezes beautifully, so you can prep a batch on Sunday and bake fresh cookies on a busy Tuesday. Just portion, freeze, and bake straight from frozen.
- My kids absolutely devour this every time I make it. The soft, chewy centre with the chocolate kiss on top turns dinner into a celebration without any fuss.

Ingredients You’ll Need
- 125g unsalted butter, softened
- 200g caster sugar
- 1 large egg
- 1 teaspoon vanilla extract
- 200g smooth peanut butter (unsweetened or standard)
- 250g plain flour
- 1 teaspoon bicarbonate of soda
- ½ teaspoon salt
- 50g granulated sugar (for rolling)
- 24 milk chocolate kisses, unwrapped
Tip: For the softest texture, use a standard supermarket peanut butter rather than the natural, oil-separated kind. The stabilisers in regular peanut butter help the cookies hold their shape and stay tender.
How to Make Peanut Butter Blossoms
- Preheat and prepare: Set your oven to 180°C (160°C fan) and line two baking trays with parchment paper. The trays should be cool to the touch before you place the dough on them.
- Cream the butter and sugar: In a large mixing bowl, beat the softened butter and 200g caster sugar together until the mixture looks pale yellow and feels light and fluffy when you lift the spoon. This should take about 2 minutes. The sound will change from a heavy thud to a lighter, airy swoosh.
- Add the wet ingredients: Crack the egg into the bowl, pour in the vanilla extract, and add the peanut butter. Stir until everything is fully combined. The mixture will darken to a warm tan colour and smell richly of roasted peanuts and vanilla.
- Incorporate the dry ingredients: Sift the flour, bicarbonate of soda, and salt into the wet mixture. Fold gently with a wooden spoon or spatula until no streaks of white flour remain. The dough will be soft but not sticky, and it should hold together when pressed between your fingers.
- Shape and roll: Scoop out tablespoon-sized portions of dough and roll each into a smooth ball. Roll each ball in the granulated sugar until completely coated. Place them on the prepared baking trays, spacing them about 5cm apart. They will spread slightly as they bake.
- Bake until golden: Slide the trays into the preheated oven and bake for 10 to 12 minutes. The cookies are ready when the edges turn a light golden brown and the centres look slightly puffed and set. You should smell a warm, nutty aroma filling your kitchen.
- Press the kisses: As soon as the trays come out of the oven, gently press one chocolate kiss into the centre of each cookie. The heat will soften the chocolate, creating that signature blossom shape. Let the cookies cool on the tray for 5 minutes, then transfer to a wire rack. The bottoms should be firm but not hard, and the chocolate will be slightly melted and shiny.
Tips From My Kitchen
- Don’t overmix the dough: Once you add the flour, stir only until it disappears. Overmixing develops the gluten, which makes the cookies tough and dense rather than soft and tender. I stop as soon as I see the last bit of flour vanish.
- Use a cookie scoop for uniformity: A standard tablespoon scoop ensures every cookie is the same size, so they bake evenly. Uneven sizes mean some will be overdone while others are still raw in the middle.
- Chill the dough if your kitchen is warm: On a hot day, the dough can become too soft and sticky. Pop it in the fridge for 10 minutes before rolling. This firms up the butter and prevents the cookies from spreading into flat discs.
- Press the kisses immediately: The window for pressing the chocolate is short. If you wait more than a minute after baking, the cookies start to set and the kisses won’t sink in properly. Work quickly but gently.
- Freeze for later: Roll the dough into balls and place them on a tray in the freezer for an hour. Once frozen solid, transfer them to a zip-top bag. When you’re ready to bake, place frozen dough balls on a tray, add 2 extra minutes to the baking time, and press the kisses on as usual. Fresh cookies any night of the week.
Equipment You’ll Need
- Large mixing bowl
- Wooden spoon or silicone spatula
- Baking trays (2)
- Parchment paper
- Cookie scoop or tablespoon
- Wire cooling rack
Common Mistakes to Avoid
- Overcrowding the pan: Placing dough balls too close together causes them to merge into one giant cookie during baking. Leave at least 5cm between each ball to allow for spreading. If your trays are small, bake in batches.
- Wrong temperature: Baking at too high a temperature will brown the edges before the centre is cooked, leaving you with raw dough in the middle. Stick to 180°C and use an oven thermometer if your oven runs hot or cold.
- Skipping the rest time: Moving the cookies to a wire rack immediately after baking can cause them to break apart because they are still soft. Let them rest on the tray for 5 minutes so they firm up enough to handle without crumbling.
Delicious Variations to Try
- Spicy Version: Add ½ teaspoon of ground cinnamon and a pinch of cayenne pepper to the flour mixture. The warmth of the spices complements the sweet peanut butter and chocolate beautifully.
- Vegetarian/Vegan Option: Use a vegan butter block and a flax egg (1 tablespoon ground flaxseed mixed with 3 tablespoons water, left to sit for 5 minutes). Choose a dairy-free chocolate kiss or button. The texture will be slightly softer, but the flavour remains excellent.
- Different Protein: Swap the peanut butter for almond butter or cashew butter. Keep the same measurements, and note that almond butter produces a slightly drier dough, so you may need to add 1 tablespoon of milk to bring it together.
What to Serve With Peanut Butter Blossoms
- A tall glass of cold milk or a dairy-free alternative
- A scoop of vanilla ice cream for an indulgent dessert
- Fresh apple slices or grapes to balance the sweetness
- A warm cup of tea or coffee for an afternoon pick-me-up
Still hungry for ideas? You might also love Creamy Peanut Butter Smoothie Recipe, 4 Ingredient Peanut Butter Balls Easy from our sister kitchens.
Frequently Asked Questions
Peanut Butter Blossoms
Ingredients
Method
- Preheat and prepare: Set your oven to 180°C (160°C fan) and line two baking trays with parchment paper. The trays should be cool to the touch before you place the dough on them.
- Cream the butter and sugar: In a large mixing bowl, beat the softened butter and 200g caster sugar together until the mixture looks pale yellow and feels light and fluffy when you lift the spoon. This should take about 2 minutes. The sound will change from a heavy thud to a lighter, airy swoosh.
- Add the wet ingredients: Crack the egg into the bowl, pour in the vanilla extract, and add the peanut butter. Stir until everything is fully combined. The mixture will darken to a warm tan colour and smell richly of roasted peanuts and vanilla.
- Incorporate the dry ingredients: Sift the flour, bicarbonate of soda, and salt into the wet mixture. Fold gently with a wooden spoon or spatula until no streaks of white flour remain. The dough will be soft but not sticky, and it should hold together when pressed between your fingers.
- Shape and roll: Scoop out tablespoon-sized portions of dough and roll each into a smooth ball. Roll each ball in the granulated sugar until completely coated. Place them on the prepared baking trays, spacing them about 5cm apart. They will spread slightly as they bake.
- Bake until golden: Slide the trays into the preheated oven and bake for 10 to 12 minutes. The cookies are ready when the edges turn a light golden brown and the centres look slightly puffed and set. You should smell a warm, nutty aroma filling your kitchen.
- Press the kisses: As soon as the trays come out of the oven, gently press one chocolate kiss into the centre of each cookie. The heat will soften the chocolate, creating that signature blossom shape. Let the cookies cool on the tray for 5 minutes, then transfer to a wire rack. The bottoms should be firm but not hard, and the chocolate will be slightly melted and shiny.
Notes
I stumbled upon this combination by accident, and it’s been a hit ever since. These Peanut Butter Blossoms have saved more weeknight dinners than I can count, and I hope they do the same for your family. If you try them, I’d love to hear how they turned out—drop a comment below and share your own tips. For another sweet treat that comes together in a flash, have a look at these Creamy No Bake Oreo Cheesecake Cups Recipe 2 or these Soft Apple Breakfast Cookies With Oats And Raisins 2 for a breakfast-friendly option. Happy baking!