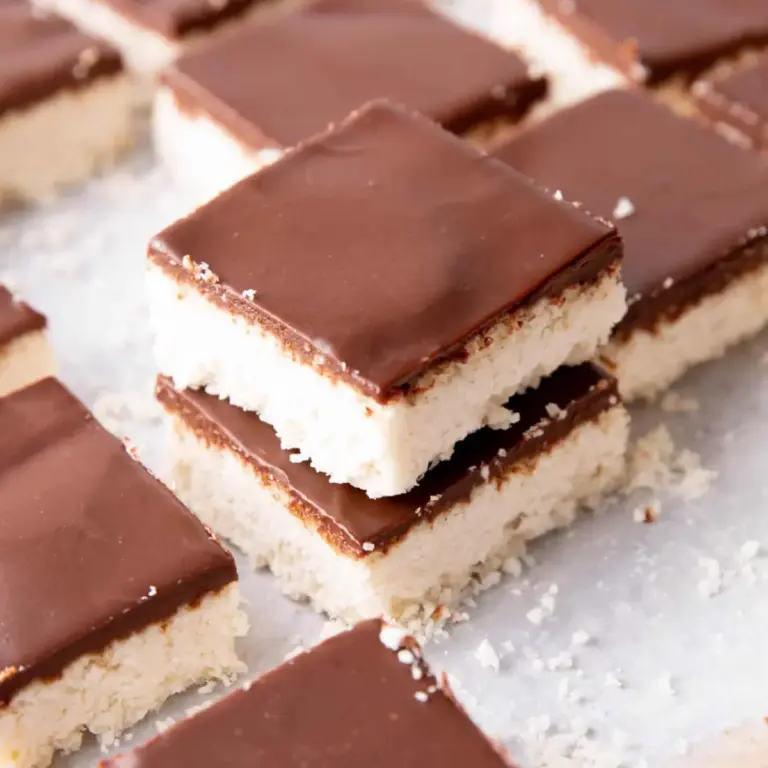
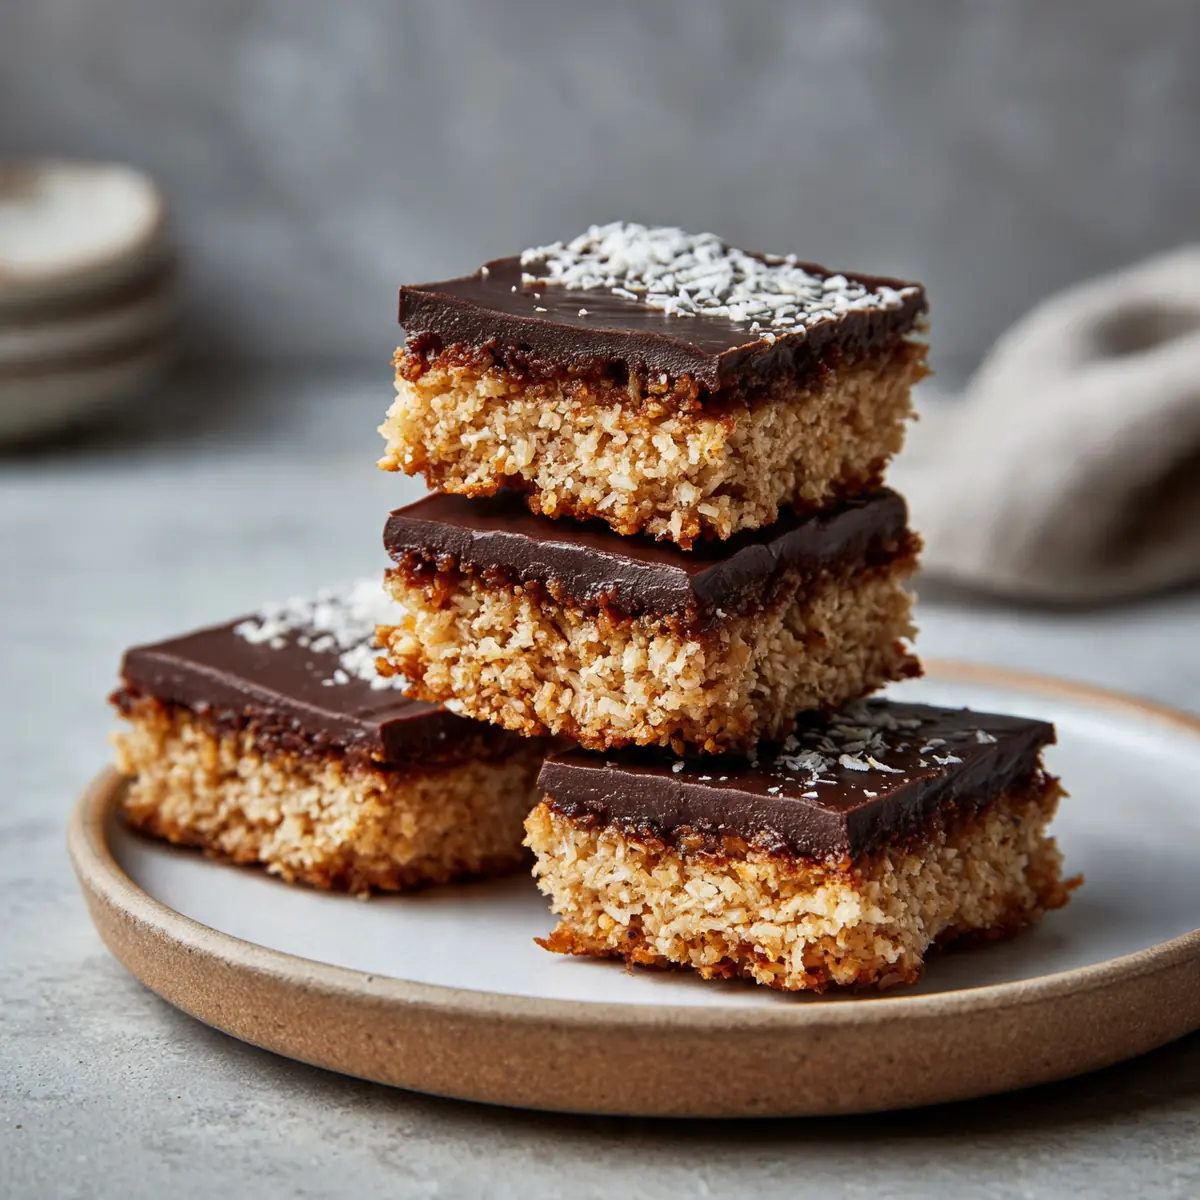
Homemade Chocolate Coconut Keto Bars Snack
As a busy mum and home cook, I understand the relentless juggle of weeknights. The school run, homework, after-school clubs, and then the inevitable question: “What’s for dinner?” It’s a query that can often send shivers down my spine, especially when I’m tired and craving something wholesome yet speedy.
My kitchen has always been a sanctuary, but during the week, it transforms into a strategic operations centre. I’m constantly searching for dishes and components that save time without sacrificing flavour or nutrition. That’s precisely how these Homemade Chocolate Coconut Keto Bars became an unexpected, yet utterly indispensable, part of our weeknight routine.
These aren’t just a snack; they’re a clever, make-ahead dessert solution that frees up precious evening minutes. Imagine having a wholesome, satisfying sweet treat, much like our Zesty No Bake Key Lime Cheesecake Jars, ready and waiting, eliminating the need for last-minute dessert faff or reaching for less nutritious options. They offer a moment of calm and a sweet finish to even the most chaotic of evenings, ensuring everyone feels nourished and content without adding to the evening’s pressures.
Recipe Overview
- Prep time: 20 minutes
- Chill time: 2 hours (minimum)
- Total time: 2 hours 20 minutes
- Servings: 12-16 bars
- Difficulty: Easy
Why You’ll Love This Homemade Chocolate Coconut Keto Bars Snack
- Effortless Weeknight Dessert: These bars are a brilliant make-ahead option, meaning you can whip them up at the weekend or during a quiet afternoon and have a delicious, guilt-free dessert ready to go for those busy weeknights. No last-minute baking or complicated preparations required after a long day.
- Minimal Cleanup: With largely one-bowl preparation for the base and a simple melting process for the topping, the washing up is kept to an absolute minimum. This is a huge win when you’re trying to get the kitchen tidy before collapsing on the sofa.
- Dietary Friendly: Being ketogenic, these bars are naturally low in carbohydrates and sugar, making them suitable for those following a keto lifestyle or simply looking to reduce their sugar intake. They offer a satisfying sweetness without the usual sugar crash.
- Customisable & Versatile: While the core recipe is fantastic, it’s also incredibly adaptable. You can easily adjust the sweetness, vary the nut butter, or add different toppings to suit your family’s preferences, ensuring everyone gets a treat they love.
- Wholesome Ingredients: Packed with healthy fats from coconut and nuts, and using a high-quality dark chocolate, these bars provide sustained energy and a feeling of fullness. They’re a much better option than many shop-bought treats, giving you peace of mind about what your family is consuming.

Ingredients You’ll Need
- 200g unsweetened desiccated coconut
- 120g almond flour (or ground almonds)
- 60g unsalted butter, melted
- 60ml full-fat coconut milk (from a can, thick cream only)
- 60ml sugar-free maple syrup or erythritol syrup
- 1 teaspoon vanilla extract
- Pinch of fine sea salt
- 150g dark chocolate (at least 85% cocoa solids, sugar-free if preferred)
- 30g coconut oil
- Optional: 1-2 tablespoons powdered erythritol (for extra sweetness in the base)
- Optional: Flaky sea salt for sprinkling
Tip: Always opt for unsweetened desiccated coconut to control the sugar content. If you can’t find sugar-free maple syrup, a good quality erythritol syrup works beautifully, providing sweetness without the carbs.
How to Make Homemade Chocolate Coconut Keto Bars Snack
- Prepare the Base: In a large mixing bowl, combine the 200g unsweetened desiccated coconut, 120g almond flour, and a pinch of fine sea salt. Give it a good stir until everything is evenly distributed and the mixture looks light and fluffy.
- Melt Wet Ingredients: In a separate, microwave-safe bowl or a small saucepan, gently melt the 60g unsalted butter. Once melted and golden, add the 60ml full-fat coconut milk (just the thick cream from the top of the can), 60ml sugar-free maple syrup (or erythritol syrup), and 1 teaspoon vanilla extract. Whisk these together until they are well combined and the mixture smells fragrant and sweet.
- Combine & Press: Pour the wet ingredients into the dry coconut mixture. Mix thoroughly with a wooden spoon or spatula until a sticky, cohesive dough forms. It should feel moist and hold together when pressed, like damp sand. If it feels too dry, add another teaspoon of coconut milk. Press this mixture firmly and evenly into a 20cm x 20cm baking tin lined with baking parchment, ensuring it reaches into all the corners and the surface is smooth.
- Chill the Base: Place the tin in the refrigerator for at least 30 minutes. This chilling period allows the base to firm up and become more stable, making it easier to top and cut later. You’ll notice it feels much more solid to the touch.
- Prepare the Chocolate Topping: While the base is chilling, break the 150g dark chocolate into small pieces and place them in a heatproof bowl. Add the 30g coconut oil. Gently melt this mixture over a bain-marie (a pan of simmering water) or in short bursts in the microwave, stirring frequently. The chocolate should become glossy and smooth, with a rich, inviting aroma.
- Assemble the Bars: Retrieve the chilled coconut base from the fridge. Pour the melted chocolate mixture evenly over the top, spreading it right to the edges with the back of a spoon or an offset spatula. The chocolate will be dark and shiny. If desired, sprinkle a little flaky sea salt over the top for a lovely contrast in flavour.
- Final Chill & Cut: Return the tin to the refrigerator for at least 1.5 to 2 hours, or until the chocolate topping is completely set and firm to the touch. Once solid, lift the parchment paper to remove the slab from the tin. Using a sharp, warm knife (run under hot water and wiped dry), cut the slab into 12-16 bars or squares. The cuts will be clean and the bars will hold their shape beautifully.
Tips From My Kitchen
- Optimise Your Coconut Milk: When using canned full-fat coconut milk, place the can in the fridge overnight. This causes the thick coconut cream to separate and rise to the top, making it easier to scoop out the richer, lower-carb portion needed for the recipe. The remaining liquid can be used in smoothies or curries, reducing waste and optimising the texture of your bars.
- Adjust Sweetness to Taste: While the recipe specifies sugar-free maple syrup or erythritol syrup, personal preference for sweetness varies greatly. Taste the coconut base mixture before pressing it into the tin. If you prefer a sweeter bar, you can add 1-2 tablespoons of powdered erythritol at this stage. This ensures your bars are perfectly tailored to your palate without overdoing it.
- Achieve Clean Cuts: For professional-looking bars with crisp edges, my trick is to use a very sharp knife that has been warmed under hot running water and then thoroughly dried. The warm blade slices through the chocolate topping and the firm base without dragging or cracking, giving you neat, uniform pieces every time. It’s a small step that makes a big difference to the presentation.
- Invest in Quality Dark Chocolate: The flavour of these bars heavily relies on the quality of your chocolate. Opt for a dark chocolate with at least 85% cocoa solids, and ideally one that is specifically labelled as sugar-free or very low in sugar if you’re strictly adhering to a keto diet. A higher quality chocolate will offer a more intense, nuanced flavour that elevates the entire bar and complements the coconut beautifully.
- Storage for Longevity: These bars keep exceptionally well, which is fantastic for meal prepping desserts for the week. Store them in an airtight container in the refrigerator. This not only maintains their texture and prevents them from softening, but also enhances their shelf life, allowing you to enjoy a delicious treat whenever you need a boost. They typically last for up to two weeks in the fridge, making them an ideal make-ahead option.
Equipment You’ll Need
- Large mixing bowl
- Medium mixing bowl (for melting chocolate)
- 20cm x 20cm (8×8 inch) baking tin
- Baking parchment
- Wooden spoon or spatula
- Whisk
- Sharp knife
- Measuring cups and spoons
What to Serve With Homemade Chocolate Coconut Keto Bars Snack
- A cup of hot black coffee or an herbal tea.
- A small bowl of fresh berries like raspberries or strawberries.
- A dollop of unsweetened whipped cream or coconut cream.
- Alongside a light, protein-rich main course like grilled chicken or baked fish to complete a balanced weeknight dinner.
Frequently Asked Questions
Homemade Chocolate Coconut Keto Bars Snack
Ingredients
Method
-
Prepare the Base: In a large mixing bowl, combine the 200g unsweetened desiccated coconut, 120g almond flour, and a pinch of fine sea salt. Give it a good stir until everything is evenly distributed and the mixture looks light and fluffy.
-
Melt Wet Ingredients: In a separate, microwave-safe bowl or a small saucepan, gently melt the 60g unsalted butter. Once melted and golden, add the 60ml full-fat coconut milk (just the thick cream from the top of the can), 60ml sugar-free maple syrup (or erythritol syrup), and 1 teaspoon vanilla extract. Whisk these together until they are well combined and the mixture smells fragrant and sweet.
-
Combine & Press: Pour the wet ingredients into the dry coconut mixture. Mix thoroughly with a wooden spoon or spatula until a sticky, cohesive dough forms. It should feel moist and hold together when pressed, like damp sand. If it feels too dry, add another teaspoon of coconut milk. Press this mixture firmly and evenly into a 20cm x 20cm baking tin lined with baking parchment, ensuring it reaches into all the corners and the surface is smooth.
-
Chill the Base: Place the tin in the refrigerator for at least 30 minutes. This chilling period allows the base to firm up and become more stable, making it easier to top and cut later. You’ll notice it feels much more solid to the touch.
-
Prepare the Chocolate Topping: While the base is chilling, break the 150g dark chocolate into small pieces and place them in a heatproof bowl. Add the 30g coconut oil. Gently melt this mixture over a bain-marie (a pan of simmering water) or in short bursts in the microwave, stirring frequently. The chocolate should become glossy and smooth, with a rich, inviting aroma.
-
Assemble the Bars: Retrieve the chilled coconut base from the fridge. Pour the melted chocolate mixture evenly over the top, spreading it right to the edges with the back of a spoon or an offset spatula. The chocolate will be dark and shiny. If desired, sprinkle a little flaky sea salt over the top for a lovely contrast in flavour.
-
Final Chill & Cut: Return the tin to the refrigerator for at least 1.5 to 2 hours, or until the chocolate topping is completely set and firm to the touch. Once solid, lift the parchment paper to remove the slab from the tin. Using a sharp, warm knife (run under hot water and wiped dry), cut the slab into 12-16 bars or squares. The cuts will be clean and the bars will hold their shape beautifully.
Notes
There you have it – a truly brilliant solution for those harried weeknights. These Homemade Chocolate Coconut Keto Bars aren’t just a recipe; they’re a little bit of culinary foresight that brings calm and contentment to the busiest of schedules. I make this at least once a week – it’s become a family favourite, ensuring a delicious, wholesome dessert is always on hand, even when dinner has been a mad dash. I stumbled upon this combination by accident, and it’s been a hit ever since, proving that sometimes the best discoveries happen when you’re simply trying to make life a little easier. Do give them a try and let me know in the comments below how they transform your weeknight routine!